Windows is widely used all around the world by a lot of computer users. If you also use Windows OS, you know how easy and customizable it is for your choice. An interesting factor that everybody knows about is that Windows can be transferred to a new computer or disk too. Also, learn about Windows Hosting in this guide.
Well, if you didn’t, worry not. In this write-up, you will get to know about the ways how you can transfer the OS to another device through many ways. Also, learn about the Key Aspects Of Windows Hosting with this guide.
The clear-cut response is “Yes.” Thanks to technological advancements, customers now have many alternatives to transfer windows. It is necessary to comprehend this potential since it leads to a multitude of advantages, such as increased storage capacity and higher system performance.
If you are interested in learning more about the specifics of this yes response, see Tenorshare’s extensive tutorial at 4DDiG. This source provides information on the procedure and establishes the framework for the parts of our guide that follow.
To guarantee a smooth and successful transfer, how to move Windows is a procedure that demands careful planning.
This stage entails a number of important actions, including protecting your data, making sure it is compatible, and choosing the right tools for the task. To give you a thorough grasp of the preparation process, let’s go further into each area.
It’s paramount to protect your significant data before starting the transfer. To avoid losing any indispensable files, documents, or media during the migrating process, you must create a backup of them.
The transfer guides you through the process of protecting your information and highlights the need for data backup.
Moving windows to a new drive requires careful consideration of compatibility issues. The destination has to work with your system’s hardware and software. Make that the other drive satisfies or surpasses the parameters needed to host the operating system by looking over its specs.
Take into account other elements like interface type (SATA, NVMe, etc.), file system compatibility, and disk size.
Choose the right moving tools to ensure a smooth process. Different tools vary in capability, compatibility, and usability. Consider the migration’s complexity, your technical knowledge, and the program’s features.
If you prefer a simple interface with step-by-step instructions, 4DDiG Partition Manager may be ideal. If you are technically savvy, you may want to pick more flexible, customizable alternatives.
The system requirements for transferring the C drive to the fresh SSD and present drives must be confirmed before transferring. Make sure the fresh disk has adequate space for applications and files. Make sure your PC’s software and hardware support your migration technique.
The system requirements for “transfer C drive to new SSD” and present storage must be confirmed before transferring. Make sure the other disk has adequate space for applications and files. Make sure your PC’s software and hardware support your migration technique.
DID YOU KNOW?
As of November 2023, Windows is the most popular Windows desktop operating system, with a market share of about 68%.
Let’s use the potent 4DDiG Partition Manager to move the OS to a new storage. Because of the user-friendly design of this tool, users with different degrees of technical competence may complete the full procedure. An extensive guide to each stage of the procedure is provided below:
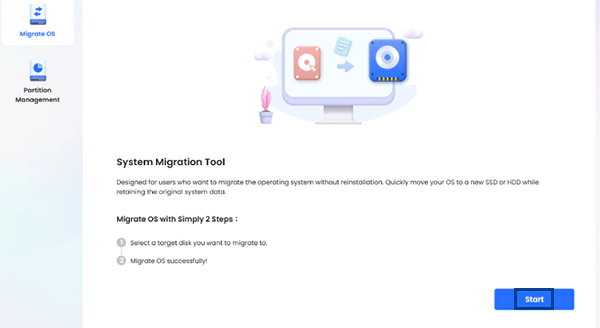
The first step in using 4DDiG Partition Manager for migration is to download the program from its official website. Go to the download area that is appropriate for your system architecture and choose the 32- or 64-bit version. Launch the installer when it has been downloaded to start the installation procedure.
After the installation is finished, open the 4DDiG application. A user-friendly interface that makes it simple to navigate and access the tools required for conversion will welcome you.

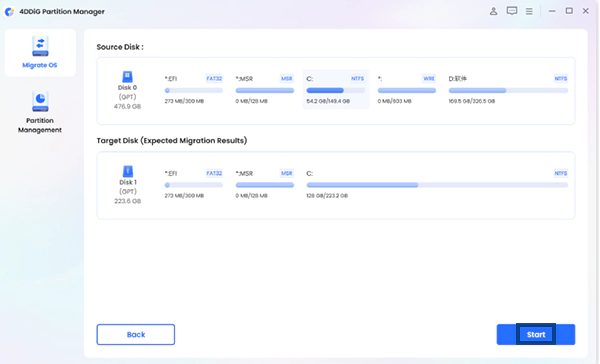
You will need to designate the source and destination disks for the migration in the 4DDiG Partition Manager main interface. Select the place where the OS is currently installed as the source. Next, choose the fresh drive that you want to use to move Windows to a location, which is the destination.
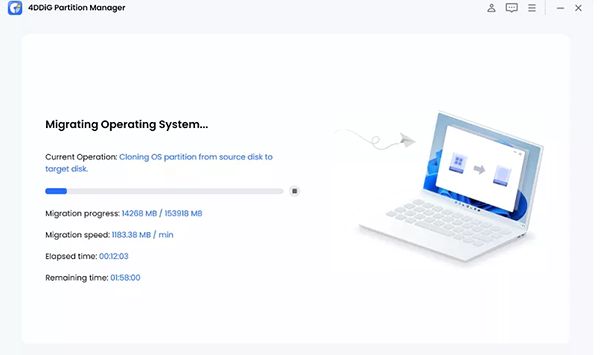
Now that the source and destination drives have been chosen, the migration procedure may begin. Locate and pick the 4DDiG interface “start the migration” option.
Your operating system, programs, and data will now start to transfer to the specified destination location via the software.
While 4DDiG does its magic, have patience. The amount of your data and the functionality of your system will determine how long the transfer procedure takes. You will get updates on the migration process via the software interface in the form of a progress bar or indication.
If you want to know more about “Move Windows to Another Drive”, please read this article.

When the migration is finished, 4DDiG will let you know. Spend some time confirming that it has been successfully transferred to the new disk.
Make sure that all of your settings, programs, and data have been migrated correctly. Try starting your computer from the new location to make sure it is adjusting to its new location without any issues.
Although 4DDiG Partition Manager provides an easy-to-use solution, there are other ways to move Windows to another location. Every technique accommodates varying tastes and technical skills.
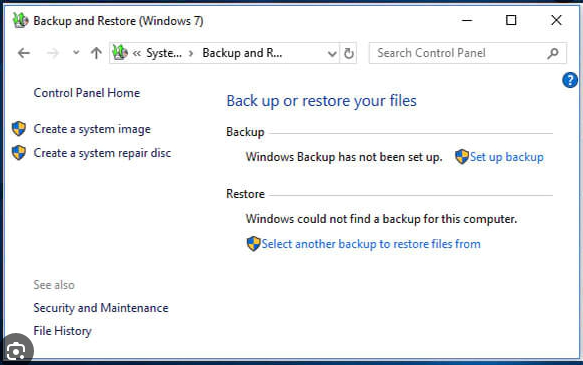
Windows System Image Tool is a good choice for those who know how to utilize native tools. By using this technique, you may restore your present installation on the new disk by making a system image of it.
Once the backup procedure has begun, watch for its completion. This procedure entails building an all-encompassing picture of your system.
After the backup is finished, use the installation disc to start your computer.
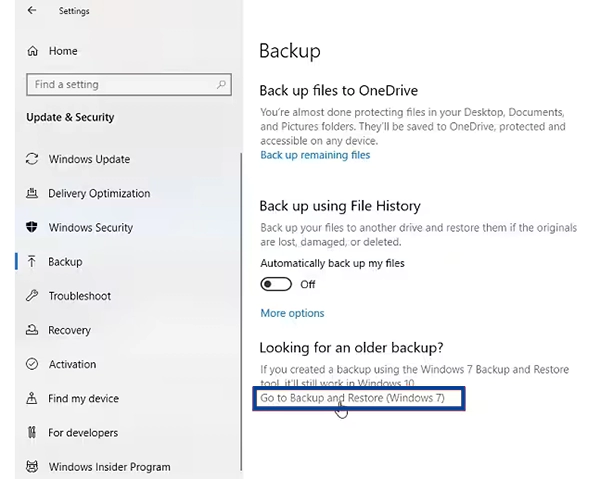
Another way to transfer Windows is to use manual backup and restore if you’d rather work things out by yourself. Using this procedure entails backing up important information, recovering files from the backup, and then installing cleanly on the new disk.
Transfer all necessary files and folders from the old disk to an external storage. This guarantees that important data will not be lost in the process of migrating.
On the disk, and install the OS from scratch. To accomplish this, boot from an installation disc and adhere to the installation instructions.
Transfer the backed-up files from the external storage to the newly installed operating system after the fresh installation.
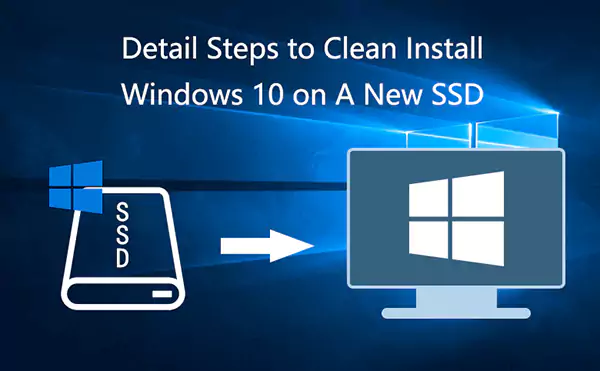
A reliable alternative for a fresh start is to do a clean installation on the new disk and install windows 10 to ssd. Using this technique guarantees the storage device will operate at its best with a clean slate, which can help transfer OS to another drive.
STATISTICS
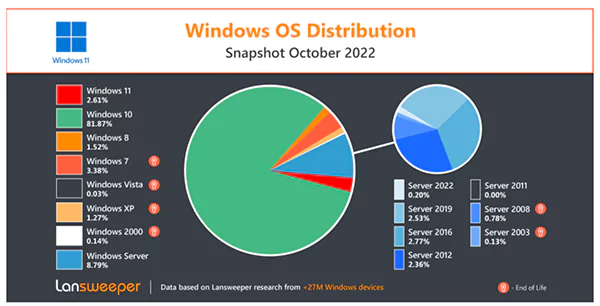
As of now, among all the Windows versions, Windows 10 is the most popular of them all.
Use the installation files to create a bootable USB device. The official Windows Media Creation Tool may be used for this.
By changing the boot order in the BIOS settings, you may configure your computer to start from the USB device.
Use the USB device to start the installation procedure.
Select the location as the installation’s destination throughout the installation process.
Ans: Utilizing SSDs’ quick data access capabilities and optimizing system speed are two benefits of installing Windows 10 on one. An elaborate synopsis delineates the main checkpoints in the process. Verifying SSD compatibility and requirements is the first step. The SSD is connected, recognized, and, if necessary, formatted after confirmation.
To create a USB drive with the required installation files, use the Windows Media Creation Tool. When the user chooses to boot from the USB device, it will take place on the SSD. After making a selection, users install and modify settings by following on-screen instructions. This meticulous process guarantees a quick and easy installation of SSD, improving system performance.
Ans: Transferring the operating system and critical data from the C drive to an SSD is crucial for quicker storage. To ensure a seamless transfer, start by downloading and installing trustworthy cloning software. Users run the cloning tool and pick C cloning after connecting the SSD internally or externally.
The cloning process starts when the source (C drive) and destination (new SSD) locations are selected. All data, including the operating system, is then transferred to c drive to the SSD. To guarantee a smooth transition to a faster storage medium, users verify that all data, including the operating system, has been moved to the SSD after cloning.
Ans: It’s usual to wonder how to transfer the file to a PC, but uBackup offers clear instructions. To prevent data loss during transfer, make a thorough backup of any critical information beforehand. In order to assist with the transfer to Windows, customers need to download and install reliable migration software on their current PC.
Following the on-screen directions, users launch the migration tool and choose Move Windows to another disk or PC after connecting the new PC to the network or other available media. After the transfer, verify the OS functions correctly on the PC by checking for missing files and settings and making any necessary adjustments.
Windows may be transferred to a new disk, and there are many methods available to move with different technical skill levels and preferences. It is impossible to overstate the importance of the 4DDiG Partition Manager, even using other methods.
Its user-friendly design and efficient performance make it stand out for individuals searching for a trustworthy migration solution. With the knowledge gained from this comprehensive tutorial, you can migrate Windows with confidence and make educated decisions.