NTFS (New Technology File System), introduced by Microsoft with the Windows NT operating system, is a proprietary file system designed for high performance, reliability, and security.
It is characterized by file system encryption, disk quotas, file system journaling, file compression, support for large sizes and volumes, and so forth.
However, historically, the Mac operating system has had limited support for the New Technology File System, often only providing read-only access to NTFS-formatted drives out of the box.
This means you could view and copy files from these drives but couldn’t write to these NTFS-formatted drives directly on the Mac operating system, even the latest macOS 14 Sonoma.
Fret not, as there are reliable solutions available to bridge this gap and enable seamless interaction with these drives on your computer.
In this guide, we’ll offer effective methods to help you read and write NTFS drives on macOS Sonoma easily.
macOS 14 Sonoma brings a plethora of exciting features and improvements, but one question persists among users: does it support read and write access to Windows NTFS drives?
Unfortunately, as of the current iteration, It does not natively offer this functionality, just as the previous macOS Ventura/Monterey/Big Sur did.
That’s to say, macOS 14 Sonoma only allows for read access to these drives but still lacks native NTFS write support, restricting you from editing, renaming, creating, deleting, and moving files on these drives on your computer.
While Sonoma lacks built-in support for NTFS write capabilities, there are still certain feasible solutions to empower you with full read-write access to these drives on macOS Sonoma.
It’s worth mentioning that you can enable full read-write access to NTFS drives on macOS Monterey/Big Sur via Mac Terminal, a third-party NTFS for Mac software, or NTFS drive reformatting.
However, starting from macOS 13 Ventura, Terminal commands can no longer be used to enable NTFS write support, and this restriction persists in Mac operating system 14 Sonoma. Thus, we’ll focus on the other two solutions in the following discussion to guide you on how to read and write NTFS drives on the macOS Sonoma version.
If you need to access and edit necessary files or documents on your NTFS drive on Mac, you can use a third-party NTFS for Mac software to assist you in handling this task efficiently.
While many NTFS for Mac utilities, both free and paid, are available for NTFS read-write support on the Mac device, you might encounter issues with your selected NTFS for Mac software like SL-NTFS following an upgrade to macOS Sonoma, as it may not yet be updated to support the new operating system.
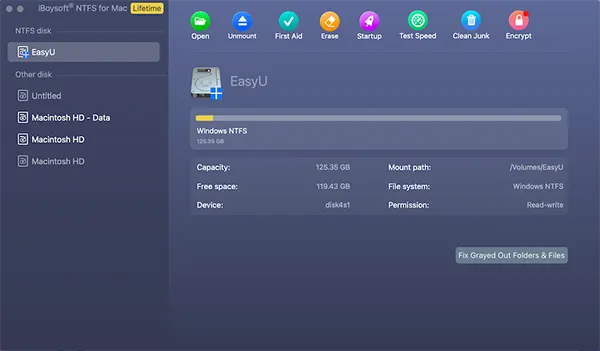
If you find that your current NTFS for Mac solution fails to enable NTFS writing on macOS 14 Sonoma, consider switching to iBoysoft NTFS for Mac.
This software stands out as a top-notch NTFS for Mac mounter that supports various macOS operating systems ranging from macOS High Sierra to macOS Sonoma and works seamlessly on both Intel-based and ARM-based Mac devices to easily mount your Windows NTFS drives in read-write mode, granting you complete read and write control over the NTFS drive within the macOS environment without drive erasure.
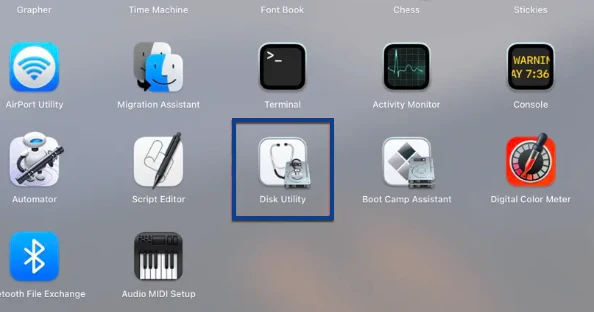
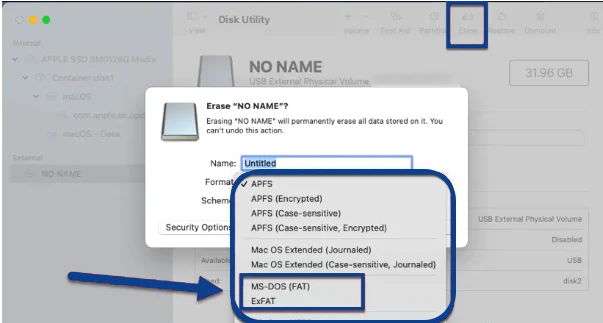
If your drive is empty or doesn’t contain confidential data, you can opt to format it to a Mac-compatible file system (like FAT32, exFAT, APFS, etc.) for Mac use. If you plan to utilize the same disk on both Mac and Windows computers, you can format the drive to either FAT32 or exFAT.
However, if you intend to exclusively use the drive on macOS Sonoma, APFS is a suitable choice. Now, let’s proceed with drive formatting from a New Technology File System to a Mac-compatible file system.
While macOS Sonoma does not inherently support writing NTFS drives, there are alternative methods, either through third-party applications like iBoysoft NTFS for Mac or performing drive erasure, to overcome this limitation.
It’s required to select the solution that best aligns with your requirements in terms of ease of use, reliability, and performance.