In the modern day, people are keen to conceal their online activities, and that is why many of us use virtual private networks when browsing, streaming, or working.
However, even with a VPN, 53% of users unsuspiciously endure DNS leaks, meaning their actual IP address and browsing activities risk being exposed (Source: Security Brief Australia, 2024).
Though this is terrifying, you can rest easy because this blog will explain how to look for such concerns using the DNS leak test and further solve them.
So, before your privacy is compromised, ensure that your VPN is functioning as it should.
Also, check out this post to understand what a DNS leak is, why it happens, how to test for it, and how to fix it to ensure your virtual private network keeps your data private.
What Is a DNS Leak?
Let us first look at what DNS actually is and how it functions before shedding light on DNS leaks.
Understanding DNS (Domain Name System)
DNS (Domain Name System) is similar to the phonebook of the internet, containing information regarding every site.
For example, it includes its domain name and IP address, which can be ascribed as example.com and 192.168.1.1, respectively, as well as the hostname, etc.
In most cases, your ISP (Internet Service Provider) handles your DNS requests as a default setting.
This means:-
✅ Your ISP keeps a record for you on logs each time you access a new site. ✅ Your browsing history may be logged or monitored.
How Does a VPN Protect DNS Requests?
A Virtual Private Network encrypts your internet traffic and reroutes it through secure servers.
Likewise, a reliable VPN should use its own private DNS servers to manage net surfing, which will let no strangers like ISPs follow your activity.
What Is a DNS Leak?
A DNS leak occurs when the virtual private network does not manage to run its requests in the encrypted tunnel, so ISP hosting is used.
This means the following:-
❌ Your ISP can still see your browsing activity even if you’re using a VPN.
❌ Websites may detect your real location, which can affect access to geo-restricted content.
❌ Your online privacy is compromised since your real IP address can be exposed.
Example of a DNS Leak
Just think of it: You’re in the UK and using a VPN to connect to a U.S. server, however, without a DNS leak, websites should see a U.S. IP address.
But if this concern occurs, your real UK ISP’s DNS servers may be exposed and reveal your actual location.
Do You Know? Paul Mockapetris expanded the Internet beyond its academic origins by inventing the Domain Name System (DNS) in 1983.
Why Do DNS Leaks Happen?
In this section, we will discuss the factors that can cause DNS leaks, so let’s look at some common ones:
1. Misconfigured VPN Settings
Not all VPNs automatically provide DNS leak protection, as some require users to manually enable domain name system encryption or configure custom DNS servers.
2. ISP Interference (Forced DNS)
Some ISPs force your device to use their DNS servers, even when you try to change them, here’s how:
You’re using public Wi-Fi hotspots that override custom DNS settings.
Your ISP hijacks DNS requests and redirects them to their own servers.
3. Windows Default DNS Settings
Windows operating systems sometimes use Smart Multi-Homed Name Resolution, which prioritizes fast domain name system responses over secure ones.
If your hosting is slow, Windows may ignore them and use your ISPs instead—causing a leak.
4. Manual DNS Configuration Conflicts
In case you set Google DNS (8.8.8.88) or Cloudflare DNS (1.1.1.1) manually before installing the VPN.
Then, your domain name system settings may ignore your VPN, which may result in a leak.
5. WebRTC Leaks in Browsers
There is still a chance that even when your virtual private network is functional, your real IP address can leak through a browser using WebRTC, a technology that is used for real-time communication.
How to Run a DNS Leak Test
You are wrong if you are saying that Testing for DNS leaks is complicated and difficult, instead, it is straightforward and can be done within a span of minutes.
Step 1: Connect to Your VPN
Make sure that your VPN is turned on and connected to any server.
Step 2: Visit a DNS Leak Test Website
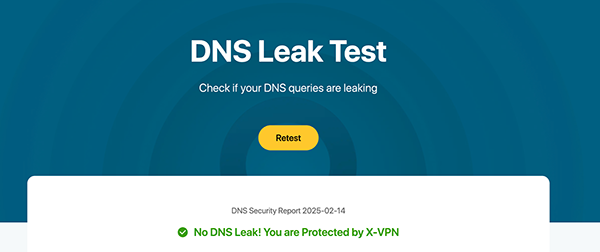
Use a free online DNS leak test tool like: ✅xvpn.io/dns-leak-test
Step 3: Run the Test
1️⃣ Click on “Standard Test” or “Extended Test” (extended test provides more details).
2️⃣ Wait for the results to load.
Step 4: Analyze the Results
If the test only shows your VPN’s DNS servers, you’re safe. ✅
If the test shows your ISP’s DNS servers, you have a domain name system leak. ❌
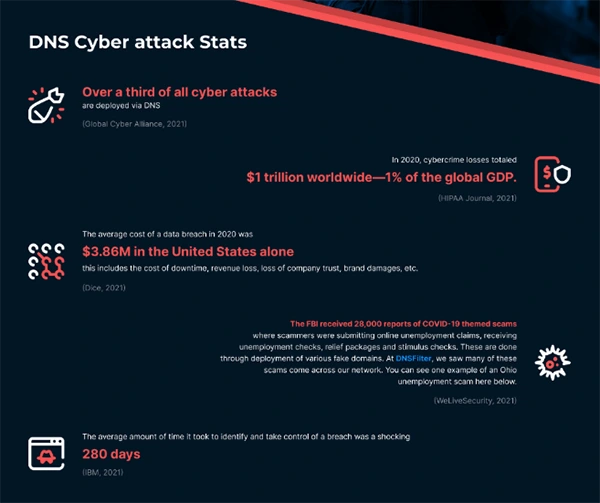
The data below demonstrates the DNS cyber attack statistics so you can better understand the matter.
How to Fix a DNS Leak
You can go through the following basic steps to fix the DNS leak:
1. Enable DNS Leak Protection in Your VPN
Most premium VPNs include a leak protection feature for the domain name system.
All you need to do is check your virtual private network settings and enable it if available.
2. Use a VPN with Private DNS Servers
Some virtual private networks have a greater chance of leaking data because they depend on the hosting of a domain name system of another entity.
Therefore, to ensure more security, select a VPN provider that has its own DNS servers.
3. Manually Change Your DNS Settings
If your VPN doesn’t handle the domain name system properly, manually set your DNS servers to a trusted provider:
✅ Cloudflare DNS – 1.1.1.1 / 1.0.0.1 ✅ Google DNS – 8.8.8.8 / 8.8.4.4 ✅ OpenDNS – 208.67.222.222 / 208.67.220.220
🔹 How to change DNS on Windows:
1️⃣ Go to Control Panel → Network & Internet → Network and Sharing Center.
2️⃣ Click on Change adapter settings.
3️⃣ Right-click your active connection → Properties.
4️⃣ Select Internet Protocol Version 4 (TCP/IPv4) → Properties.
5️⃣ Choose Use the following DNS server addresses and enter your preferred DNS.
🔹 How to change DNS on macOS:
1️⃣ Go to System Settings → Wi-Fi → Advanced.
2️⃣ Click DNS → Add a new domain name system server (e.g., 1.1.1.1).
4. Disable WebRTC in Your Browser
WebRTC leaks can expose your real IP address even if your VPN is working correctly.
Disable WebRTC in your browser settings:
✅ Chrome/Edge: Install the WebRTC Leak Prevent extension.
✅ Firefox: Type about:config → search media.peerconnection.enabled → set it to false.
5. Use a Firewall to Block Non-VPN Traffic
A firewall can block all non-VPN traffic and can even prevent domain name system leaks.
On Windows, you can:
1️⃣ Open Windows Defender Firewall.
2️⃣ Create a new rule to block all outbound traffic except through the VPN interface.
6. Switch to a More Secure VPN
Your current virtual private networks may not provide DNS leak protection, and if that’s the case, change your VPN provider to one that prioritizes security.
Frequently Asked Questions (FAQs)
1. Can free VPNs prevent DNS leaks?
Most free VPNs do not offer DNS leak protection, and for that reason, it is often not reliable for one who is looking for robust privacy.
2. How often should I check for DNS leaks?
It is good practice to test for domain name system leaks every several weeks or when switching to a new VPN service provider.
3. Do DNS leaks affect internet speed?
Not directly, but having a secure DNS provider (like Cloudflare or Google) can sometimes improve speed.
Conclusion
There is always a possibility of a DNS leak disclosing some of your information, even with a VPN running; luckily, a simple domain name system leak test can fix that.
✅ Run a DNS leak test today to verify that your virtual private networks protect the privacy that it claims! 🚀