Did you know? 92% of marketers say video marketing has given them a good ROI, according to OptinMonster.
As we all know, the internet has become the most sensational way to attract the audience in this decade.
And video content is booming right now in both long and short formats. But the main question is, some people are facing quality issues during consumption.
That’s where a video converter comes in and becomes a lifesaver for you as it fulfills all your viewing and entertainment demands within a few clicks.
In this blog post, we are going to study more about this segment and give valuable insights to the readers.
Let’s begin!
Key Takeaways
Understanding the complete metrics of video converters’ functioning.
Analyzing the factors affecting conversion quality and speed
Exploring this phenomenon with Movavi video creator
Discussing some of the best expert tips
Finding ways to enhance productivity and scalability
How Video Converters Function
Videos can be enjoyed on a wide range of devices and platforms, regardless of the original format, thanks to video converters. The process involves a complicated interplay of encoding, decoding, and re-encoding — all working together to transform one video file into another. At its core, a video converter works by taking an existing video file and changing its underlying structure and data. This transformation is done in several steps.
Step #1 — Decoding (Unpacking the Original Video)
The first step is decoding. It is a process of unpacking or deciphering the original video file. Each asset uses a specific codec that specifies how the video and audio data are compressed and stored. A video converter must identify the codec used in the original file and then employ the corresponding decoder to translate this data back into its raw, uncompressed form. This involves unpacking the video frames, extracting audio information, and understanding how they are arranged together.
Step #2 — Intermediate Video Processing (Tweaking and Transforming)
Once a video and audio have been decoded, a tool performs a variety of processing tasks to change the video file type. This is where the magic happens, allowing for customization and optimization. Some common processing functions are as follows:
Resolution adjustment — This involves changing the size of the video frames. You might want to downscale a high-res 4K video to a lower resolution like 1080p for better compatibility with older devices or smaller screens. You might also attempt to upscale a lower resolution video, though this often results in a blurry image.
The frame rate conversion refers to the number of frames displayed per second. Adjusting the frame rate can smooth out playback on devices with different refresh rates or create special effects like slow motion.
Bitrate adjustment — The bitrate determines the amount of data used to represent each second of video. Lowering the bitrate reduces the file size, but it can also impact video quality. Conversely, increasing the bitrate can improve quality but results in a larger file size.
Audio modifications — The converter can also adjust audio parameters (volume, audio codec, and sample rate). It can also convert the audio to a different format — be it MP3 or AAC.
Cropping and editing — Many converters are packed with basic editing functions. Some may allow you to crop unwanted parts of the frame or add simple effects, for example.
Step #3 — Encoding (Packing for the New Format)
After the processing steps are complete, a movie converter encodes the modified video and audio data into a new format. This involves selecting a new codec model and configuring its capabilities.
Choosing the right codec is crucial for ensuring compatibility with the target device and optimizing video quality. The encoding process re-compresses the video and audio data using the selected codec. Thus, a new video file with the desired format, resolution, frame rate, and bitrate is created.
Step #4 — Containerization (Wrapping It All Up)
Finally, the encoded video containing the video and audio is being carried out. The latter acts as a wrapper. It upholds the complete data of the output in meta structures like chapters and bookmarkers. Common container formats are MP4, AVI, MKV, and MOV. The converter selects the appropriate container format based on the desired compatibility and features.
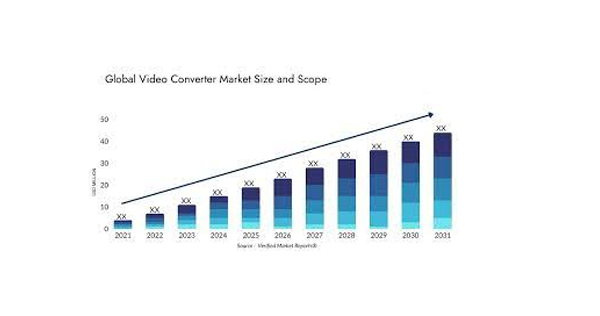
Intriguing Insights
This infographic shows the demographics of the Global Video Converter Market
Factors Affecting Video Conversion Quality and Speed
During the initial stages of your procedure of conversions, you will realize that some tools are masterful in efficiency while others are brilliant in publishing higher video quality. This happens not randomly. The quality and speed of video conversion are influenced by specific factors:
Processing power — Video conversion is a computationally intensive task. A computer consisting of a more powerful chipset and double the RAM will perform better.
Codec efficiency — Different codecs have varying levels of compression efficiency. A more exemplary codec will provide enhanced results even in situations like lower bitrate inputs.
Converter software — The quality and optimization of the converter itself play a pivotal role. Well-designed converters use optimized algorithms and can leverage hardware acceleration features to improve speed and quality.
Source video quality — The quality of the original video file also affects the outcome. It is mostly impossible to upgrade the actual tone of the poor quality input into an astonishing title.
Therefore, it is important to select a powerful tool to convert video formats. Thus, you can be sure to get a high-quality file with zero delay or hassle.
Interesting Facts Video content is 50 times more useful in terms of driving search results compared to plain text. (Tubular Insights)
How to Convert a Video Using Movavi Video Converter
The process of converting videos with Movavi Video Converter is quite straightforward and user-friendly.
Hence, if in any case, one required to create quality content for your social media marketing campaign, you can go with the following these steps:
From the official Movavi website, download the software and then install it on your Windows PC or Mac.
Once installation is complete, launch the program.
Then, click the “Add Media” button in the top left corner.
Now, pick up the Add Video, then browse your computer to locate and open the video file(s) you want to convert.
Alternatively, you can drag and drop files directly into the program window.
Next, you will see the Video, Audio, Images, and Devices tabs in the lower half of the interface.
Click the Video tab to see available formats.
Select the desired output format (e.g., MP4, MOV, AVI).
Now, pick up a preset that matches your preferred codec, resolution, and quality settings.
To reduce the necessary file size, just click the file size indicator and use the slider to adjust compression, or you can know here – How to compress MP4.
To trim, crop, add subtitles, or apply effects before conversion, click “Edit”.
After editing, click “Save and Close.”
At the bottom, click “Save to…” to choose where the converted file will be saved.
You can now pick up a new folder or reuse a previously used location.
Click the “Convert” button in the bottom right corner.
Once finished, the output folder will open automatically, showing your converted video.
With a great interface, Movavi makes video conversion easy. You can quickly add files, select a format, maybe edit or compress, select a save location, and convert. This facilitates video preparation for every platform or device.
Video Conversion Tips From Content Experts
If it is the first time you need to change file types, video conversion can be challenging.
Follow these professional supported recommendations to guarantee a seamless and effective video conversion process:
Select a reliable and easy to use tool that offers multiple formats.
A user-friendly tool should have a good reputation and allows for easy work across many ended formats.
Always ensure that a copy exists before manipulating the original video.
This will prevent quality loss from the process within the conversion.
Pick the style that matches your platform or the device you are targeting.
Adjust settings such as video resolution, bitrate, and aspect ratio for optimum quality without bloating the file size.
Use compression to reduce file size and ensure smooth playback, but avoid over-compressing.
Test different compression levels to find the best trade-off between size and clarity.
Ensure your video’s resolution, aspect ratio, and file size are suitable for mobile devices.
Confirm that you possess a stable internet connection along with a reliable power supply prior to utilizing online converters to evade cuts and graphical errors.
Ensure your videos are not confidential prior to uploading to avoid privacy exposures.
Make Your Videos Quality, Scalable, and Compatible
Knowing about video formats helps you to smoothly create and share videos.
Completing a video project requires quite a bit of work, but something like format issues or playback errors can arise.
You’ll be better prepared to fix these problems by understanding the basics of video formats and conversion settings.
This also enables you to create higher-quality videos that work seamlessly across various devices.
Frequently Asked Questions
Ans: They may recompress the video to another format in a process called transcoding, or may simply change the container format without changing the video format.
Ans: These services are designed to transform video files from one format to another, ensuring they can be viewed and shared on various devices and platforms.
Ans: Video processing consists of signal processing employing statistical analysis and video filters to extract information or perform video manipulation.